DIY – Pizza Oven

In 2018, after some 3-6 months of careful consideration and thoroughly studying practically everything available on the internet about how to build a traditional Pompeii Pizza Oven, I finally decided to make the first move and build my own pizza oven.
In this summary, I will try to document and show the steps in the process of its construction, which may assist others in the building of their own brick ovens.
Unfortunately, I neglected to document the construction process in all its details as I had planned at the very beginning, but the photographs taken by my family and me will help me to recall the milestones and most important details of the building process.
The ‘bible’ I consulted, naturally, came from fornobravo.com, for which I should express my greatest thanks. In addition to the many ideas, pictures and descriptions that can be found in the internet, the construction plan, which anyone can download free of charge from Fornobravo, provides the most comprehensive and detailed description, including step-by-step pictures and various oven types to suit individual tastes. However, that does not necessarily mean that by following the manual word by word you will achieve exactly the same result. It is more a summary of plans, hints and tips, which it is highly recommended that you follow if you wish to succeed.
My intention too, was to follow the instructions and seek new solutions wherever necessary. I think it is one of the most important aspects in the construction of a DIY pizza oven that you should be creative and able to find completely new solutions that fit to your plan or local circumstances.
The internet can provide you tremendous support but your ideas and your plan will require your own tailor-made solutions. No two pizza ovens are exactly the same and accordingly, the solutions applied will differ, too. I remember the long hours I often spent just standing staring at the bricks in front of me, trying to figure out the next step, and the indescribable pleasure when I finally worked out how to proceed and achieved the result I had imagined.
I wish everybody reading my pizza oven guide the strength and endurance required and hope that their results will provide them as much pleasure as the journey to completion will.
Let the journey begin!
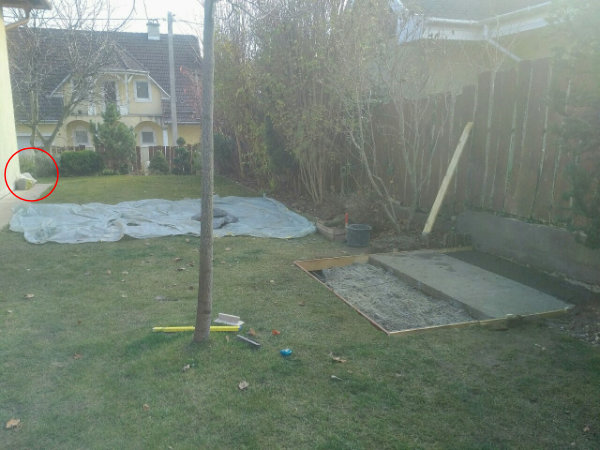
The plot. It was the end of 2018 when the work actually started. I did not want to put off building the foundation until the following spring and the weather seemed to be suitable, with neither frost nor the need to water the concrete…
Step 1 – Preparing the site of the oven, the foundation
Material requirement:
shovel, plastic sacks
Time spent on digging and clearing the area: approx. 3 hours.
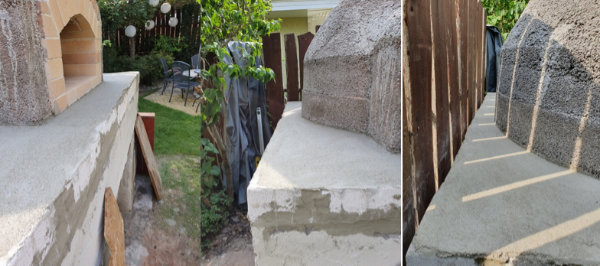
As we had an electric grill here in the garden, I decided to make the necessary addition to the existing concrete base to get the desired size of 2 m x 2 m. That is why the existing concrete foundation splits the area into three zones.
Size: 2 m x 2 m, depth: 15 cm.
The first step was not a difficult one. After returning from the morning walk with the dogs, I took the shovel, cleaned the area and put the soil into bags.
At the corners (15 cm x 15 cm), to make the construction more solid, I dug down app. 60 cm deep. For shuttering I used 15 x 2 cm wooden boards supported by wooden stakes on the outside.
0.8 and 0.6 cm reinforcing steel bars were anchored at roughly even distance before pouring the concrete.
Help came from my father-in-law who supervised the pouring and did the finishing.
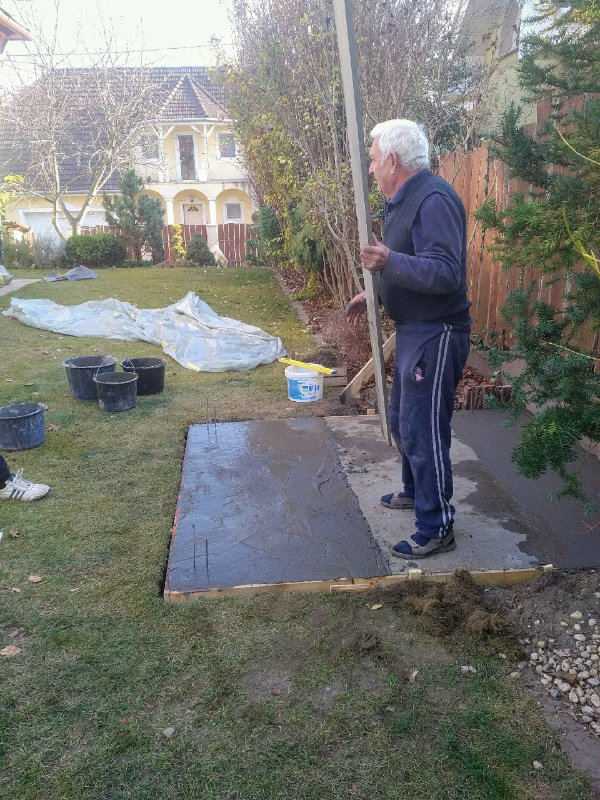
As you can see in the picture, the reinforcing bars were bent upwards at the corners to increase the strength of the base construction.

Concrete mixture ratio: 4 parts gravel to 1 part cement, mixed in a mixer borrowed from my neighbour. I used that ratio throughout the building process. Professional help came from my son and my daughter’s friend.

Material requirement of the entire project:
3 m3 gravel
6 lengths of 6 m reinforcing bar of 0.8 cm
6 lengths of 6 m reinforcing bar of 0.6 cm
15 25kg sacks of cement
Time spent on pouring: approx. 3 hours.
Step 2 – Building the walls
Material requirement:
concrete shuttering blocks of 20 x 50 x 25 cm (57 pcs) and 25 x 25 x 25 cm (3 pcs).
6 m of angle iron (lintel)
Time spent on building the walls: approx. 6 hours
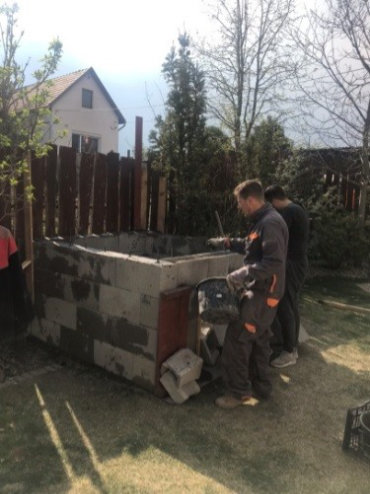
Following the tutorials of several DIY oven builders, I used construction walling. Reinforcing bar was laid in the grooves of the concrete blocks, which were anchored at the corners. Angle iron was used for the lintel spanning the entrance to the firewood store. The appropriate size was cut with an angle grinder. The blocks fitted excellently and formed a steady construct.
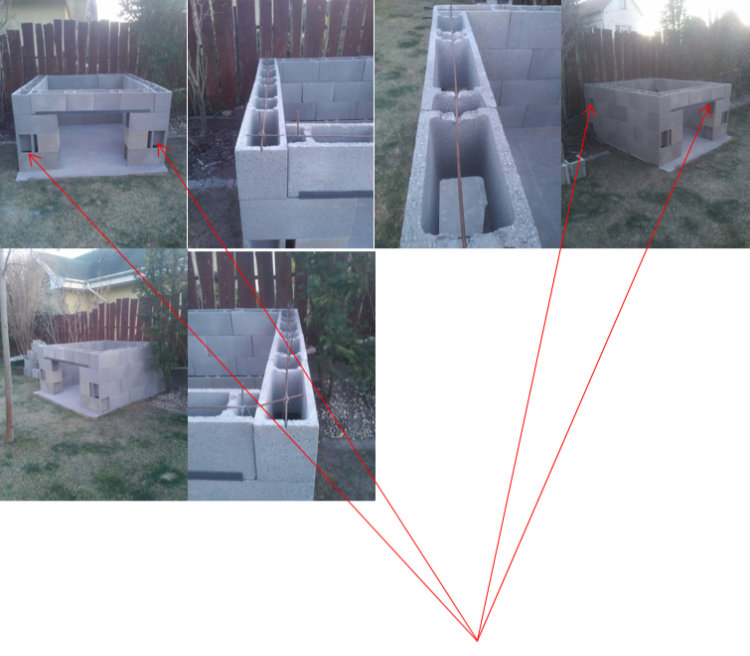
One mistake that I committed at this point was the holes you can see on the front wall and there were some similar holes on the side walls too. When building the wall and placing the blocks, you should endeavour to achieve a smooth, complete surface without any holes, as the concrete you pour in can easily escape through any holes. Shuttering can solve the problem but it is much more complicated at this stage. It is easier to form the smooth surface by using the blocks themselves.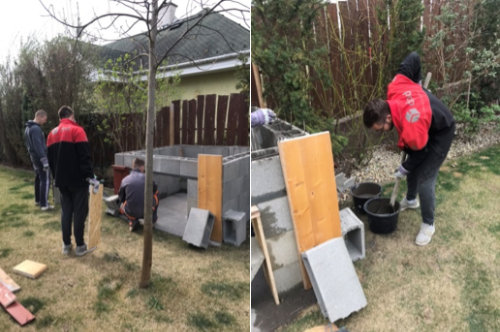
I realised I had a problem when we started pouring the concrete into the shuttering blocks and it leaked through the holes. We simply used a piece of wood as emergency shuttering and secured it as firmly as we could.
Walls prepared for pouring with reinforcing bars in the holes:

When pouring, 0.6 cm rebar was positioned in the block holes to make the construction more solid.
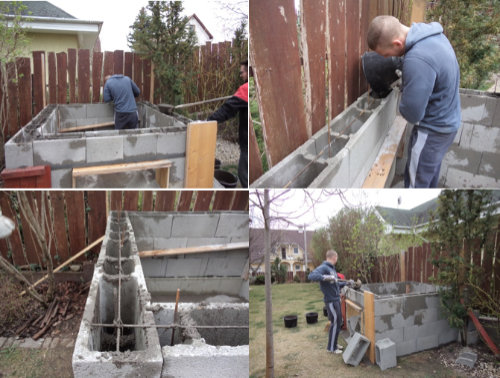
Done:
Step 3 – Building the tray
Material used:
15 x 2 cm wooden boards, plywood, wooden support braces
Time requirement: approx.
6 hours (2 hours shuttering and 4 hours pouring).
Considering a tray thickness of 10 cm, I screwed the wooden boards to the block wall as firmly as I could. Additionally, the boards were secured to the rebar by wire led through small holes previously drilled through them. These could be easily cut to remove the shuttering later.

Following that, I cut the plywood base shuttering so that it completely filled the space in the middle of the block construction and supported it in position from underneath, using wooden braces and the remaining, unused concrete blocks.
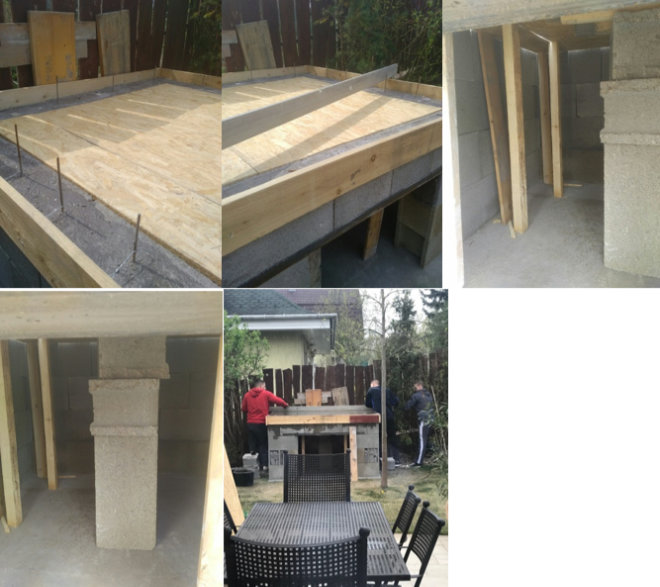
Before pouring the concrete, again, reinforcing bars were laid in the tray and fastened together with wire ties. Unfortunately, no pictures were taken of the tray being prepared for pouring or of the pouring process itself, though the last picture shows how the concrete is finished.
Step 4 – Laying insulation on the tray
Material used:
Ytong insulation bricks, adhesive (10 kg)
Time requirement: 4 hours
I used 10 cm thick Ytong insulation bricks (5 m2), which I stuck to the concrete tray using the adhesive provided. Ytong bricks are light weight and have an extremely good insulation coefficient. They are easily shaped using a saw, with no great effort.
Step 5 – Laying the bottom of the oven
Total material used for the dome:
fire bricks 250mm x 123mm x 60mm (200 pcs), 2 x 25 kg clay mortar
Time requirement: approx. 3 weeks
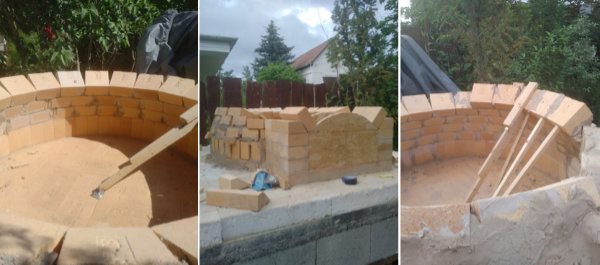
Before I started laying the first level of fire bricks, the exact middle point of the tray had to be determined. I simply used string to do so, stretching from one corner to the other crosswise. Where the strings crossed each other was the middle point of the dome and I laid out the fire bricks in fishbone pattern starting at this point.
In determining the position of the entire oven you should consider how much space will be left in front of the oven entrance. The size of the tray and that of the oven should be adjusted accordingly. In this case, with a tray size of 2 m x 2 m, a dome diameter of 107 cm and an entrance depth of 37 cm, some 23 cm left, plus an additional 5 cm, came with the overhang of the granite top.
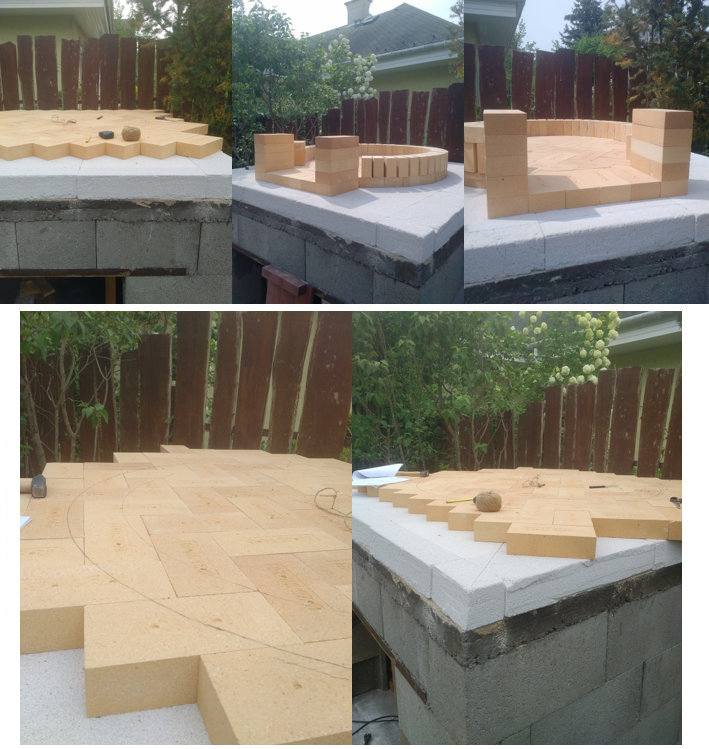
After I had drawn the circular shape of the oven with a diameter of 107 cm (42 inches), I removed the necessary bricks and cut them to the right size with an angle grinder. Cutting remained the main task for almost an entire week, as the remaining bricks for the dome had to be cut in half.
The pictures above show the first level already laid out, when I started considering how to build the dome.
Step 6 – Building the entrance
I built the entrance first, as that is quite simple and is the most striking feature.
The entrance is 50 cm wide (12.5 cm x 4) and 32 cm high at the highest point. Both sides have a height of 22 cm.
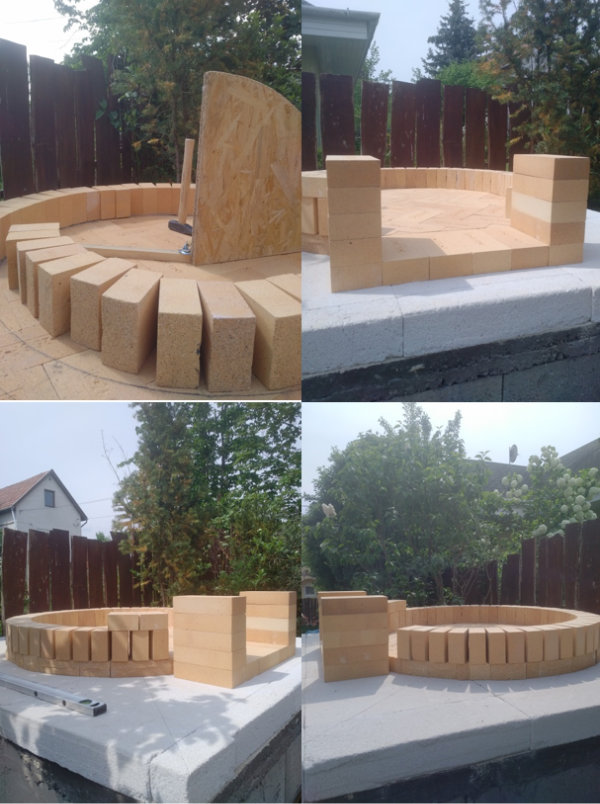
The plywood form seen standing in the middle of the oven dome was not actually used. Instead of that, I constructed a levelling device, a stave with a swivel caster fitted at one end, enabling it to move both horizontally and vertically.
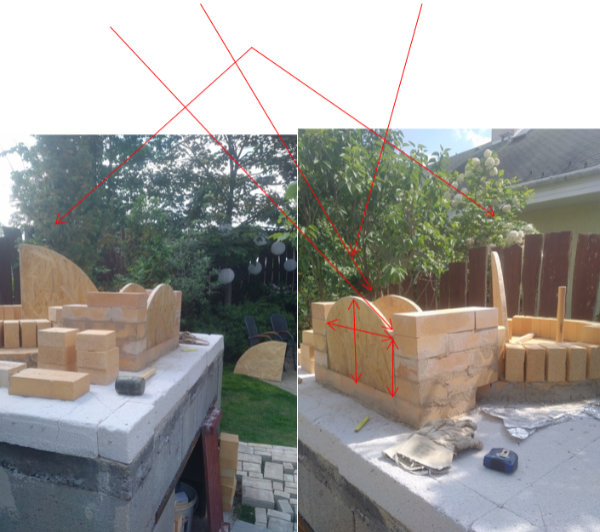
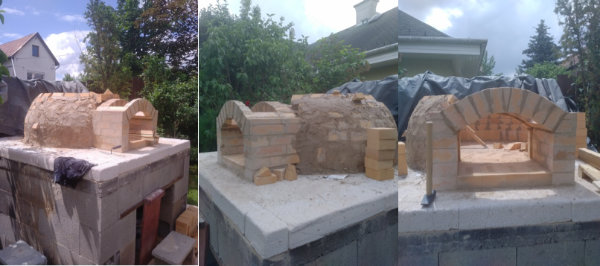
Step 7 – Building the arch
Building the arch without using support is barely possible. Accordingly, first I cut the appropriately shaped supports from plywood. As shown in the picture, due to the depth of the entrance, three pieces (front, middle, rear) had to be cut. The top of the plywood shapes had to provide enough firm support to the small bricks (each one-third of a fire brick) set on it. I drew the radius of the arch on a large paper that exactly fitted in the entrance and then the plywood was cut to that pattern.
The hole between the arches will be the entrance to the chimney. Later on, special attention should be paid to the creation of a smooth surface, which is necessary for a smooth air flow.
Fire bricks were cut into three and laid from left and right to reach the spacer form in the middle. One tiny thing that might seem to unnecessary, but is quite useful if you wish to have a door to the entrance: the bricks at the conjunction of the entrance and the door were laid to create a lip of some 1.5-2 cm (on both sides and above) against which the door will rest when in position, thus preventing it from falling into the fireplace.

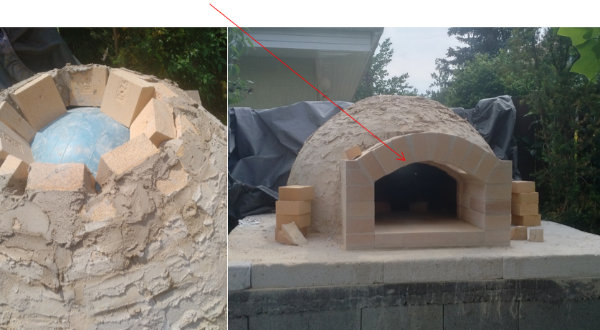
Step 8 – Building the dome
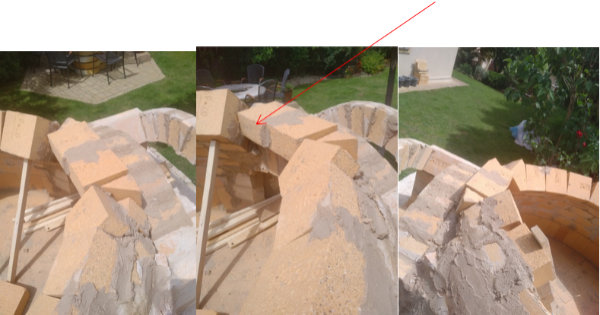
At the same time, construction of the dome was begun. The fire bricks in the first course are stood on their sides, e.g., the height of the first course equals the width of the brick, 12.3 cm. The subsequent courses were built laying the bricks on their broader side, which result in an increase in dome height of 6 cm with each course.
The earlier mentioned stave with a swivel caster at the end, fastened in the middle of the dome, ensured that the courses of bricks are positioned evenly and level. I used small pieces of brick inserted from the outside between the main structure bricks which are set at an angle to follow the curve of the dome as it rises. From a particular height, it was necessary to provide extra support for the curving dome wall using wooden staves to prevent the bricks slipping out of position while the mortar was setting.
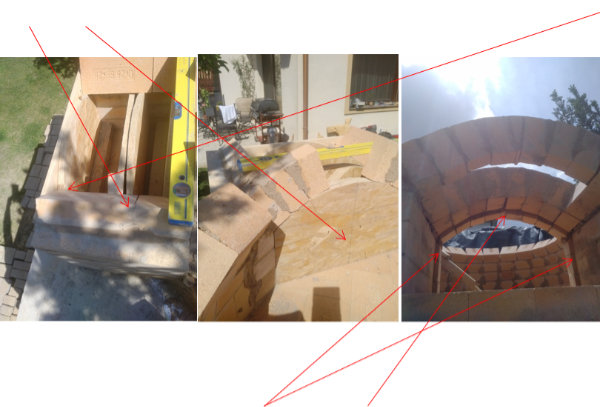
At this stage, with the entrance arch finished and the dome structure nearing completion, the two need to be joined together. For me, one of the hardest things was to figure out how to do that. Looking back, it is quite simple: create a pattern, e.g., by drawing on a piece of paper simply laid onto the brick and cut the appropriate form to the paper shape. No matter if it is not symmetric or there are minor distortions, as you will cover it all with mortar from both outside and inside and nobody will be able to see it when the dome is finished.
Actually, the whole building process is one of the 3D tailoring of bricks to fit, with an angle grinder, on the basis of drawn and cut patterns.
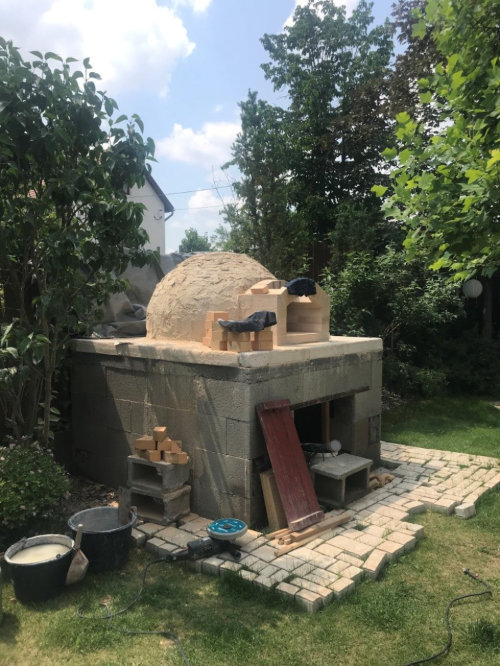
While raising the wall of the dome, I covered the outside with clay mortar.
Finishing the dome: For that, I used a fitness ball, which I put into the almost complete dome in its deflated state, then inflated it until it sat firmly inside, filling the hole at the top and providing support for the remaining bricks forming the top section.
A few days later, after the last fire brick had been laid, the dome covered with clay mortar and the whole thing allowed to set, I punctured the ball and prayed that the structure would not collapse. It did not collapse, giving me a flush of pride and I was happy be able to picture the final oven on the basis of the already quite spectacular structure.:).
Another process that must be mentioned although, unfortunately, I was unable to photograph it, is the pointing of the inside of the dome. After the dome is finished you cannot squat in the middle of it to work anymore and there is only one access left: through entrance at the front. As I wanted to achieve a nice surface and to fill in any holes and smooth out any unevenness on the inside of the dome, I had no choice than to lie on my back and slide myself in with my arms pressed close to my body. Of course, first, I placed a light, the mortar, a sponge and some water into the dome. Inside, I filled in the holes and finished pointing, with mortar, removing the excess with the wet sponge to provide a smooth oven interior. Unfortunately, I got myself covered in mortar and water so, I was quite happy when I had finished and could creep out with a totally numb body.
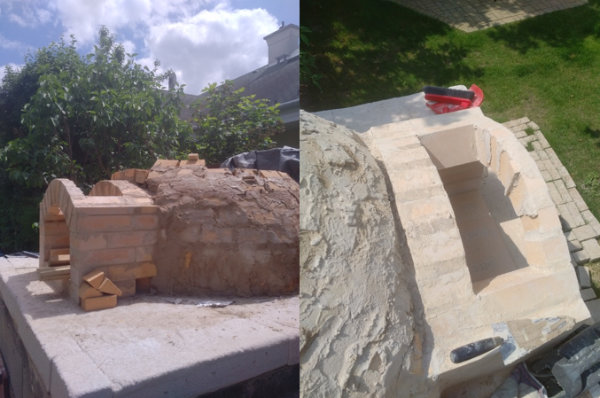
Step 9 – Building the chimney
Material requirement:
approx. 40 pcs used brick, mortar (ca. 10 kg)
Time spent on building the chimney: approx. 6 hours
After long hours of thought, I could not come up with a better solution than simply using used standard bricks (25 cm x 12 cm x 6.5 cm) and laying them on edge. As the bottom of the chimney is actually the top of the arch there is only a narrow surface to lay bricks on. I built up five courses of brick, giving a chimney height of 62.5 cm measured from the highest point of the arch (exactly 66.5 cm with mortar).
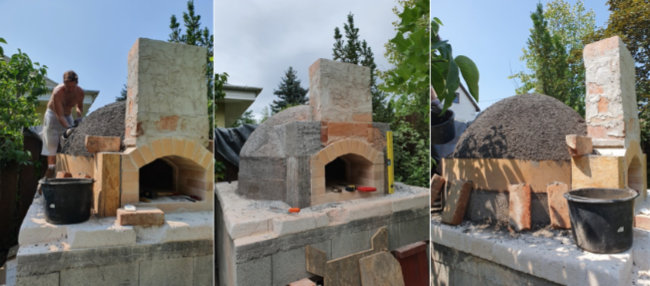
Step 10 – Insulation
Material requirement:
2 sacks of perlite concrete
Time spent on shuttering and pouring perlite: approx. 10 hours
Building a pizza oven is actually about how to keep the heat inside as efficiently as possible, that is, without losing temperature through the walls or the bottom. With the 10 cm concrete tray, the 10 cm of insulation brick and the 6 cm layer of fire bricks, we managed that on the bottom. Now that has to be achieved with the dome, too. For that, I used several layers of insulation:
First: I covered the dome with 5 cm thick fibre glass insulation.
Second: I fixed down the fibre glass with wire mesh.
Third: the wire mesh was covered with lightweight (perlite) concrete.
Unfortunately, the first two phases of that are not documented, though pictures of the third phase appear below:
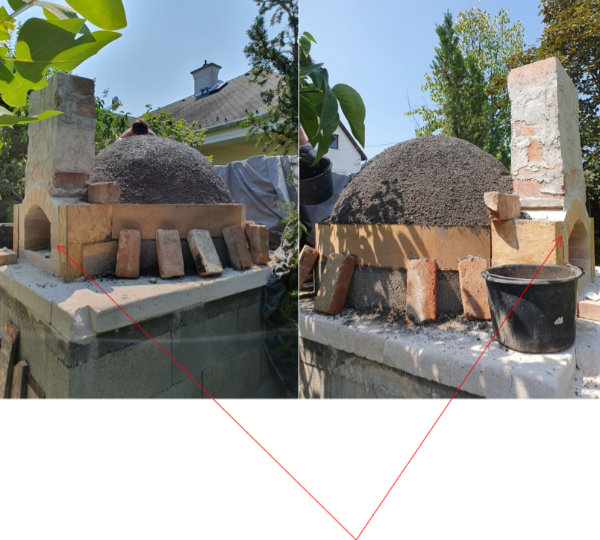
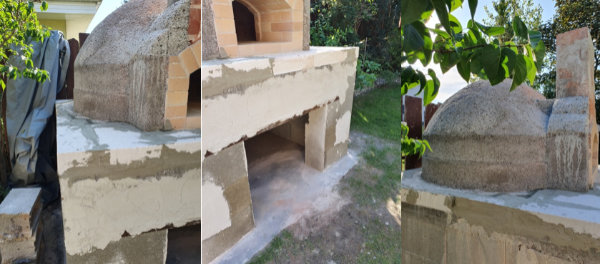
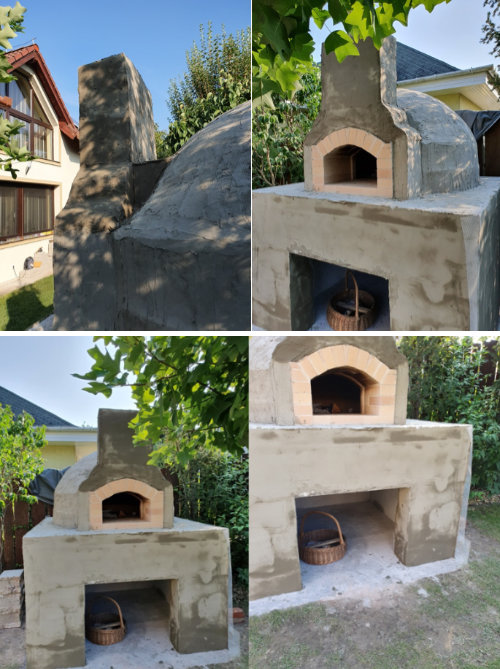
For shuttering I used 2 mm thick fibreboard, which was easy to cut and bend, on the first two levels. On the top and the sides I tried to distribute and smooth the material evenly by trowel and hand. Additional shuttering was necessary on both sides of the entrance and the junction with the chimney to give the final shape of the pizza oven. There I used pieces of plywood, which I cut to measure and screwed to each other firmly. It is important that the front side of the plywood is level with the brick wall of the entrance as after removal the remaining impression of the board (approx. 2 cm) can then be used to hold the final, decorative cladding.
The following pictures show the oven after de-shuttering. Here you can see the required depth for decorative cladding
Step 11 – Shaping
Necessary equipment:
pencil, saw
Time requirement: approx. 3 hours
In addition to its lightness, perlite concrete has the advantage that it can be shaped simply and easily by, e.g., a saw. And that is exactly what I did. I drew the desired shape on the surface with a pencil and then I cut it to shape accordingly.
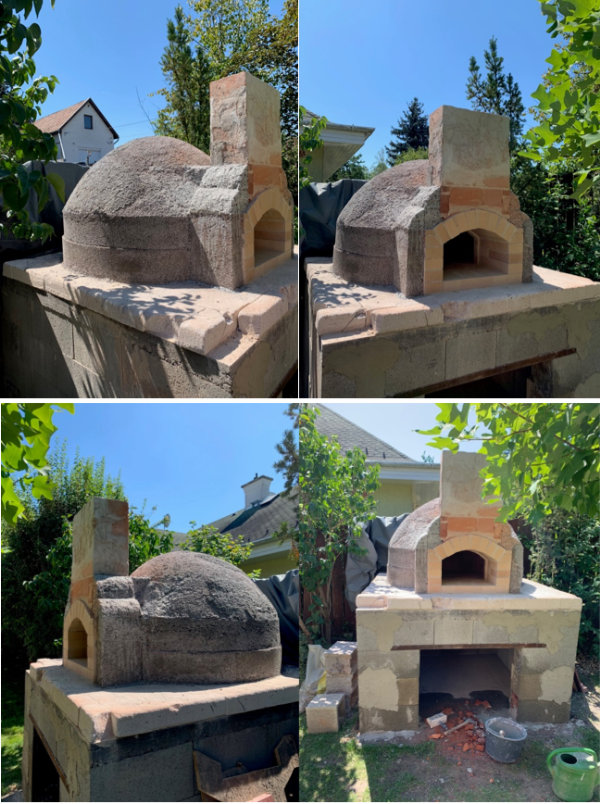
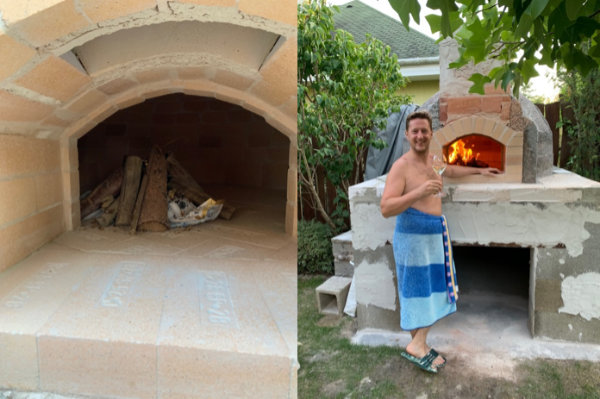
At this point, after more than six months of endeavour, I could wait no longer. I just had to know whether all the effort was worth it or just a waste of time, money and material. I needed to see with my own eyes that my imagination and reality were in harmony. I light the fire. It was very easy, it burned well and the smoke was sucked up through the chimney so easily and effectively as if I had spent years with studying chimney construction and ventillation.
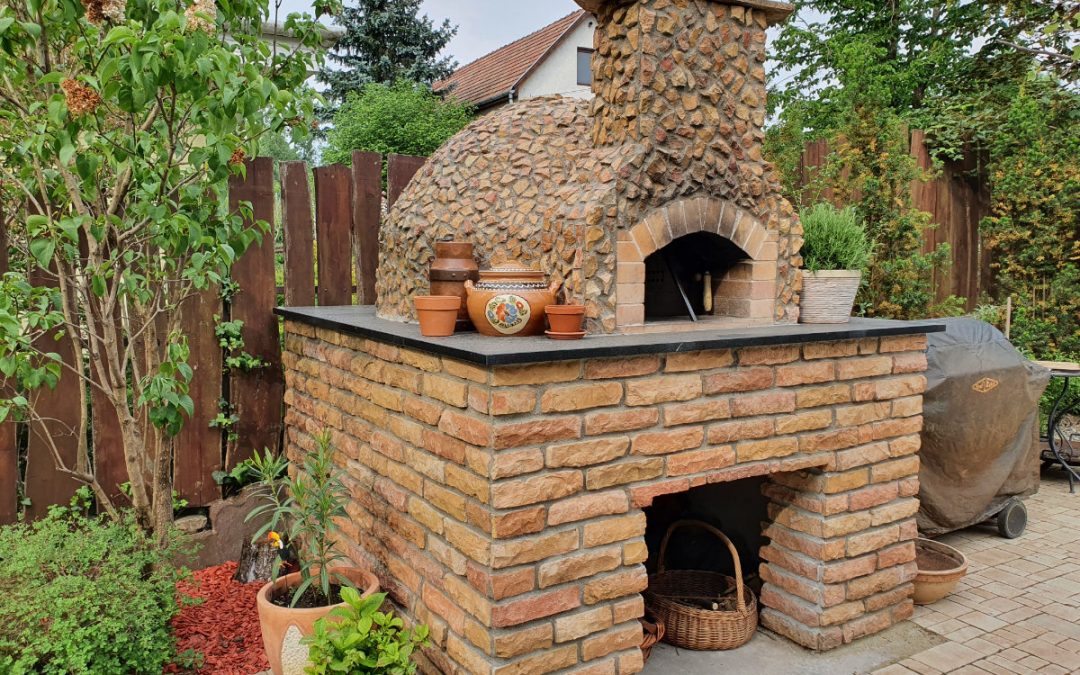
Tuscany in the garden: Prosecco and DIY pizza oven – 20 August, 2019.
The next task was to repair the insulation bricks that I had damaged walking on them while working on the dome.
In order to protect the insulation layer from future impacts I coated it with this product:
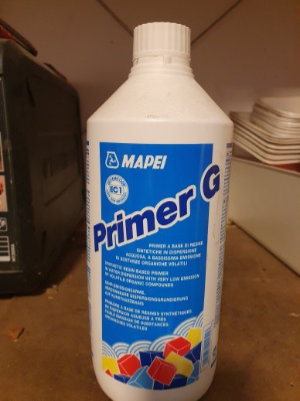
It can be applied by brush and, after drying, provides a rock solid, water resistant surface. I applied two coats to be sure. The result can be seen here below:
Step 12 – Preparation of cladding
Material requirement:
approx. 10 m2 of glass fabric net and ca. 2 x 25 kg adhesive
Time spent on cladding: approx. 10 hours
To prepare the construction for the decorative cladding, I covered the whole construction with dryvit glass fabric net. The purpose of that was to eliminate possible future micro movement underneath the decor stone, thus preventing them from falling off and also to provide an even surface for the cladding.
Step 13 – Decorative cladding
Material requirement: approx.
10 m2 of cladding brick and 2 x 25 kg mortar
Time spent on cladding: approx. 20 hours
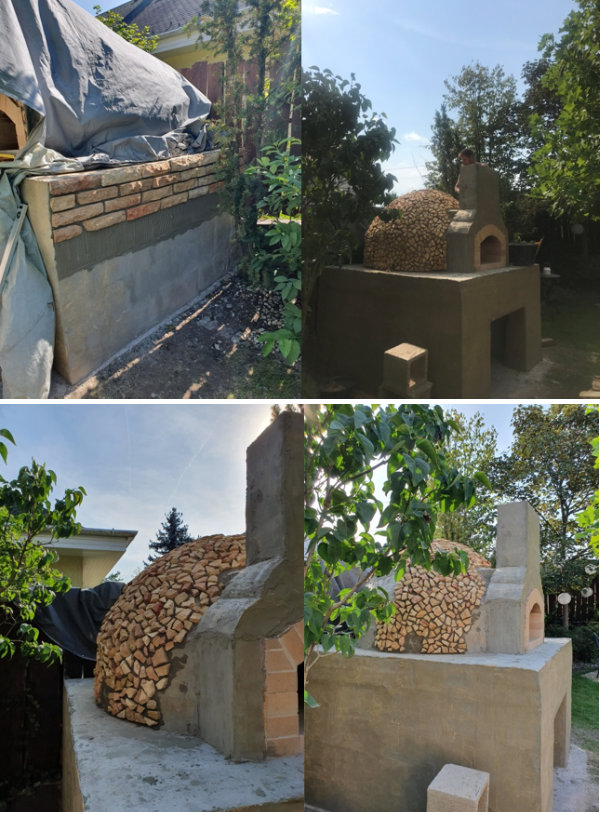
After long hours of careful consideration and several visits at stone merchants my wife and I finally decided that cladding brick should decorate our pizza oven. For the side walls I used the whole brick tiles only, while for the smaller tiles on the dome I simply broke up the whole tiles with a hammer. I was a little concerned about how long it would take to clad the whole construction with those small pieces but to my greatest surprise it went very quickly.
The plastic cover you can see in the first picture is for protection from the unpredictable weather conditions.
Step 14 – Pointing
Material requirement: 3 x 25 kg pointing mortar
Time spent on pointing: 4 days
Pointing a structure like this would not have been possible without the large piping bag (see picture below), which is not a regular kitchen item as it is made from a much stronger material.
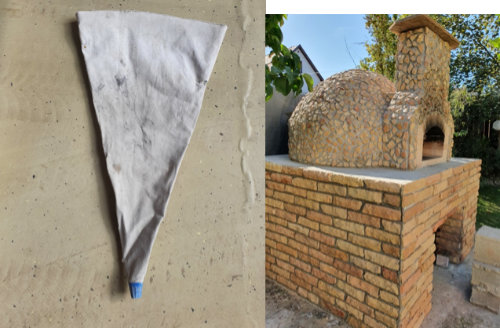
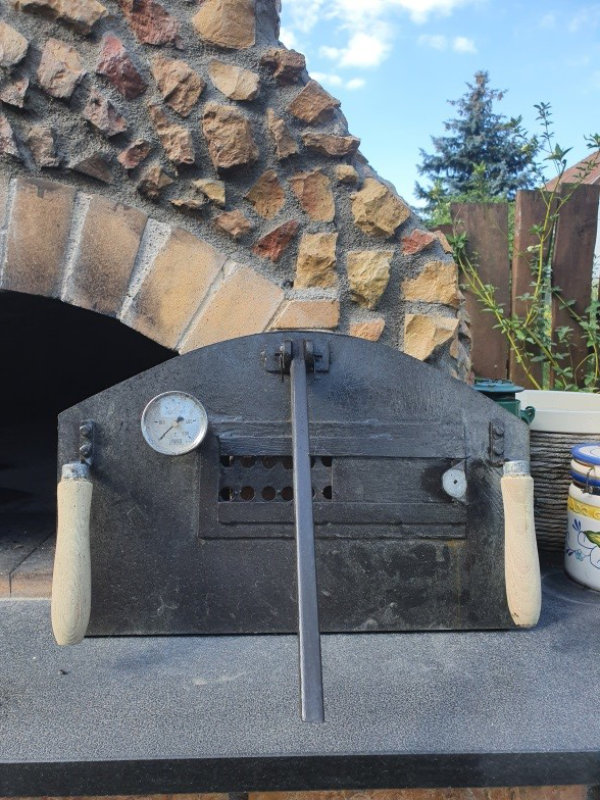
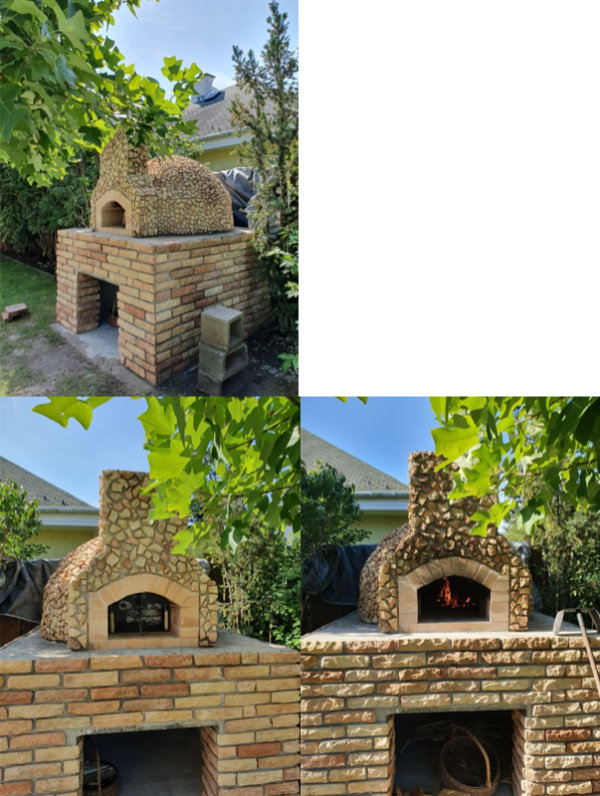
The following pictures show the oven in its last phase. In the third picture you can see the door with the built-in thermometer, which is my father-in-law’s masterpiece. The door is a very practical thing and looks really good when the oven is not in use, though on the other hand it restricts ventilation of the oven and no matter how much you leave the door vent open, the fire will go out. The embers still give off tremendous heat and, depending on the meal you want to prepare, you can decide to use the door or not.
The pointing finished, the door in its place, the fire burning – the oven is almost ready. Just the counter is missing.
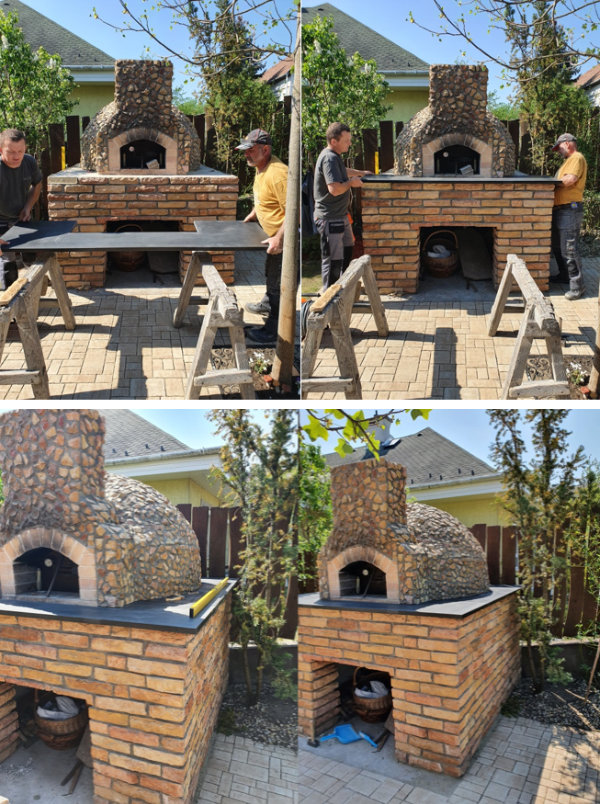
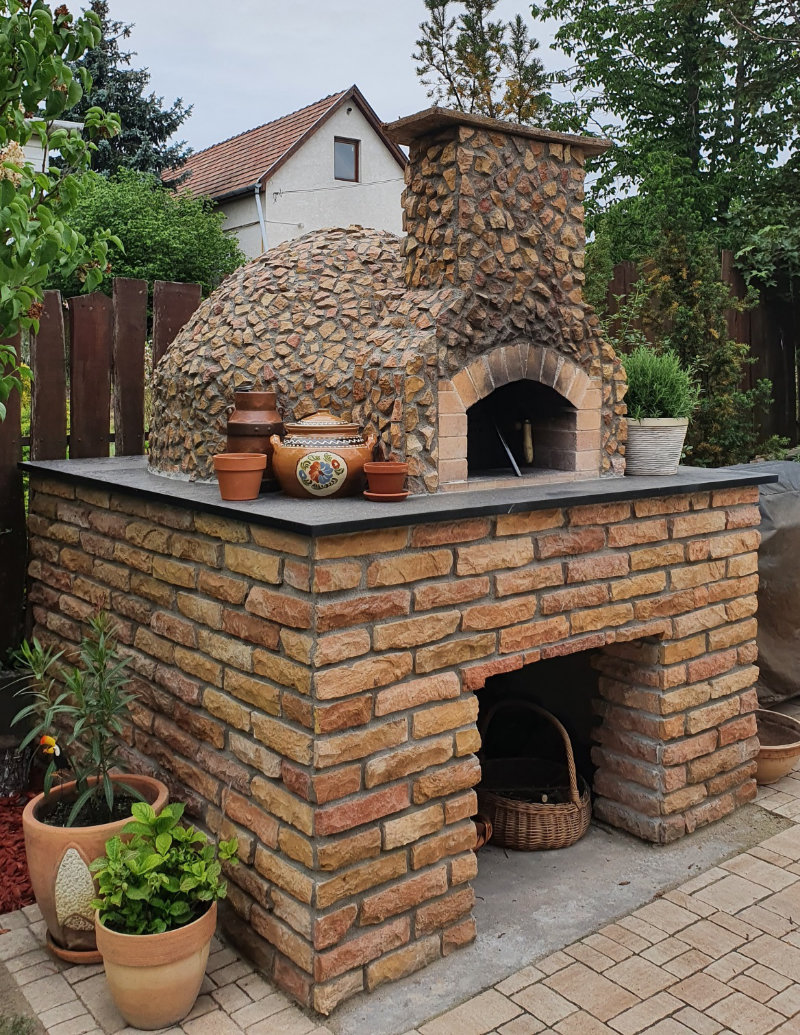
We chose black granite for the counter, which was measured and cut by a professional firm. After 4 weeks of waiting, the granite counter arrived and was fitted by the company’s professional workforce. Due to the complex form of the dome, it had to be made in 5 pieces.
As can be seen in the pictures, the lawn around the oven, which had been severely affected by the building process, was replaced by stone paving connecting the terrace, the pizza oven and the outside fire pit, making them much more integral parts of our home.
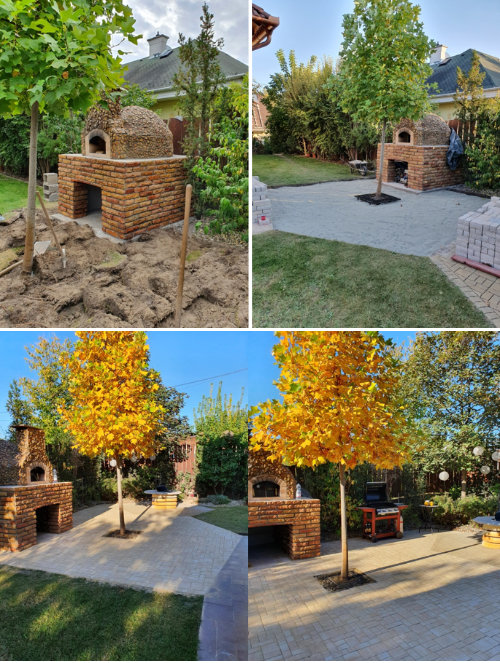
And so we come to the end of the journey. Though minor items such as a cap over the chimney or a door to the wood store are missing, the oven is ready to prepare tasty meals or to just admire the evidence of the craftsmanship put into a unique adornment of the garden.
Primarily, it is used to make the perfect Italian pizza, but it has also cooked fish, duck and pork excellently.
I would definitely recommend that if you feel the slightest inspiration to have your own pizza oven, do not hesitate to take the first step as you will take great pleasure from building the perfect place for your authentic Italian pizza.
Thank you for reading:)